0 参考资料
JAVA各版本安装包下载路径:https://www.injdk.cn/?spm=a2c6h.12873639.article-detail.22.b53720bdMO7XUf
依赖包网站:https://mvnrepository.com/
1 编程基础 1.1 Main方法
在Java语言中的一等公民,Java程序就是一个一个的类组成的
Main方法是Java程序执行的入口
1.2 基本数据类型
byte 占用1个 byte,值域是 -128 ~ 127
short 占用2个 byte,值域是-32768~ 32767
int占用4个 byte,值域是 -2147483648 ~ 2147483647。Java 中整数缺省是 int 类型
long 占用8个 byte,值域是-9223372036854774808 ~ 9223372036854774807
float-有精度,值域复杂 340282346638528859811704183484516925440
double -精度是 float 的一倍,占用8个 byte。Java 中整数缺省是 double 类型。
boolean 占用4个 byte,值域是 true, false
char 占用2个 byte,值域是所有字符( 最多 65535个)
1.3 运算符优先级 1 2 3 4 5 6 7 8 9 () ! * ,/ , % +, - >, >=, <, <= == != &, &&, |, || =
1.4 位运算符
按位并(AND):&
按位或(OR):|
按位异或(XOR):^
按位取反:~
1.5 位移运算符 1 2 3 >>: 符号位不动,其余位右移,符号位后边正数补 0,负数补 1。又称带符号右移 >>>: 符号位一起右移,左边补 0,又称无符号右移 <<: 左移,右边补 0。左移没有带符号位一说,因为符号位在最左侧
按位运算符:应用掩码
1.6 类型转换
char可以转换为int
可能出现问题的类型转换,需要使用强制类型转换,比如高精度数值向低精度数值转换。
1 2 3 4 5 6 7 8 9 10 11 12 13 14 15 public class ForceConvertValueLoss { public static void main (String[] args) { int intVal = 99 ; long longVal = 5555555555555L ; intVal = (int ) longVal; System.out.println(intVal); float floatVal = 11.32f ; double doubleVal = 1234567890.123456 ; floatVal = (float ) doubleVal; System.out.println(floatVal); System.out.println(doubleVal); } }
1.7 字符集编码和字符串
字符集就是字符的集合。一般会包含一种语言的字符。比如 GBK,是包含所有常用汉字字符的字符集。ASCII 是包含英文字符的字符集。
char代表一个字符,char 的本质也是数字。将数字映射到字符,就叫编码
ASCII 码,ASCII表: https://baike.baidu.com/item/ASCII/309296#
Java 中用的是 UTF-16 编码的 Unicode。
1 2 3 4 5 6 7 8 9 public class ComplexChar { public static void main (String[] args) { int a = 65 ; char cha = (char ) a; char zang = '\u81e7' ; System.out.println(cha); System.out.println(zang); } }
输出:
\n :换行符
字符串可以和任何类型进行加法运算,则会将这个值的字符拼接到字符串上。
字符串也可以使用 += 操作符来拼接
字符串的加法运算符符合加法运算符本身的优先级
1 2 3 4 5 6 7 8 9 10 11 12 13 14 15 16 17 18 public class StingConcat { public static void main (String[] args) { int a = 10 ; int b = 20 ; int c = a + b; System.out.println("a + b=" + c); boolean aBiggerThanB = a > b; System.out.println("a > b 是" + aBiggerThanB + "的" ); System.out.println("a + b=" + a + b); System.out.println("a + b =" + (a + b)); System.out.println("a * b=" + a * b); } }
输出:
1 2 3 4 5 a + b=30 a > b 是false的 a + b=1020 a + b =30 a * b=200
1.8 程序执行流程控制 Java中的 if-else,for语句,switch语句 语法与C语言一样。
1.9 标准输入输出
Scanner in = new Scanner(System.in) 连接标准输入,在我们例子里也就是命令行。in也是变量只是不是基本类型。
in.nextLine() 可以从命令行读取一行字符串
in.nextInt0) 可以从命令行读取一个正整数
点操作符也是Java中的操作符,和 System.out,println() 以及 Mathrandom() 中的点是一样的操作符。是对点前面的“变量”进行点后面的“操作”。这里所谓的操作,就是指方法,也就是我们一直写的 main 方法的那个方法。这些操作都是使用一个个的的方法。使用方法我们叫做调用方法( invoke a method )。方法是Java中的重中之重,我们后面会用大篇幅讲解
import java.util.Scanner; 是告诉程序,Scaner 这个类型在哪里。
创建Scanner类型的“变量”,它就是我们提过的工具,可以帮我们从标准收入读取数据
nextLine()和 nextint0)两个方法可以从命令行读取一行字符串或者一行字符串代表的整数
1.10 数组
数组的“实”是一块地址连续的内存,就像是编号连续的一沓白纸
数组的名,就是这个块连续内存的第一个内存的地址。
数组的变量和基本变量一样,本身是个地址。但是与基本变量不一样的是,这个地址的值,是数组的“名”,也就是数组的第一个地址。
数组变量.length 可以获得数组的长度
数组创建之后,长度不可以改变
访问数组过界出错的例子,数组出界的错误叫做 IndexOutofBoundException
如果没有把握数组是否会出界,可以把索引和数组长度做比较。注意索引是从 o 开始的,不是从1开始的
数组里每个元素的都有初始值,初始值和类型有关。对于数字类型,初始值是 0,对于boolean 类型,初始值是 false.
1 2 3 4 5 6 7 8 9 10 11 12 13 14 15 public class AssignArray { public static void main (String[] args) { int [] array = new int [3 ]; array[0 ] = 9 ; System.out.println("array长度为" + array.length + "。array[0] = " + array[0 ]); int [] array2 = new int [10 ]; array = array2; System.out.println("array长度为" + array.length + "。array[0] = " + array[0 ]); } }
输出:
1 2 array长度为3。array[0] = 9 array长度为10。array[0] = 0
定义:double[][] scores = new double[3][6]
1 2 3 4 5 6 7 8 9 10 11 12 13 14 15 16 17 18 19 20 21 22 23 public class MultiDimensionArray { public static void main (String[] args) { double [][] multiDimensionArr = new double [3 ][5 ]; for (int i = 0 ; i < multiDimensionArr.length; i++) { for (int j = 0 ; j < multiDimensionArr[i].length; j++) { System.out.println("multiDimensionArr[" + i + "][" + j + "]=" + multiDimensionArr[i][j]); } } multiDimensionArr[2 ] = new double [100 ]; for (int i = 0 ; i < multiDimensionArr.length; i++) { System.out.println("multiDimensionArr[" + i + "].length=" + multiDimensionArr[i].length); } } }
输出:
1 2 3 4 5 6 7 8 9 10 11 12 13 14 15 16 17 18 multiDimensionArr[0][0]=0.0 multiDimensionArr[0][1]=0.0 multiDimensionArr[0][2]=0.0 multiDimensionArr[0][3]=0.0 multiDimensionArr[0][4]=0.0 multiDimensionArr[1][0]=0.0 multiDimensionArr[1][1]=0.0 multiDimensionArr[1][2]=0.0 multiDimensionArr[1][3]=0.0 multiDimensionArr[1][4]=0.0 multiDimensionArr[2][0]=0.0 multiDimensionArr[2][1]=0.0 multiDimensionArr[2][2]=0.0 multiDimensionArr[2][3]=0.0 multiDimensionArr[2][4]=0.0 multiDimensionArr[0].length=5 multiDimensionArr[1].length=5 multiDimensionArr[2].length=100
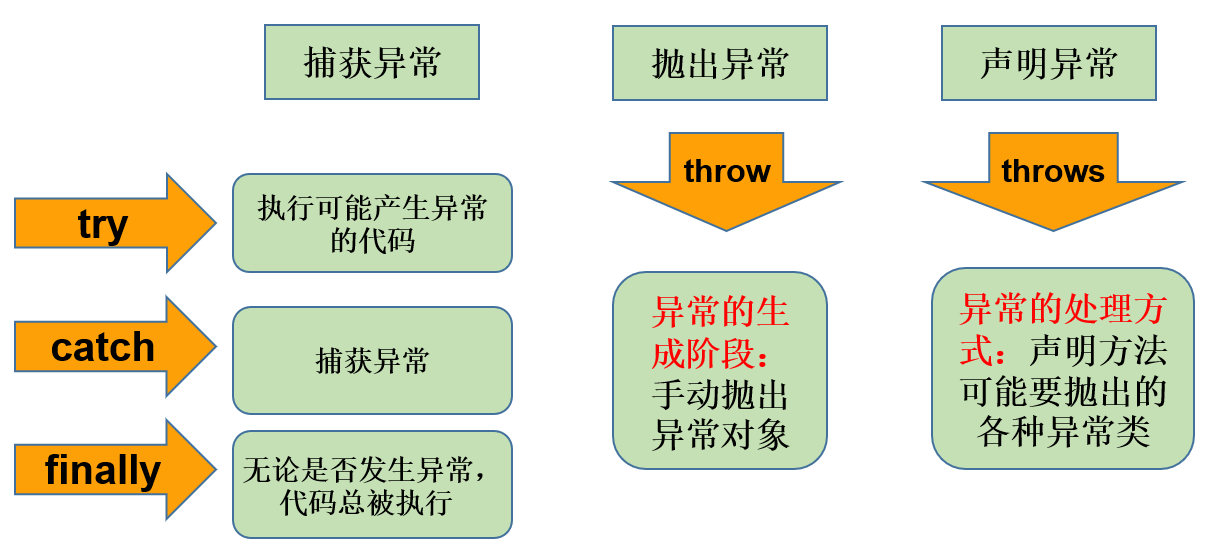
3 Java中的异常处理 3.1 try catch 在程序出错误的时候,Java支持使用异常,将错误信息封装起来,并让程序跳出正常的处理流程,交给异常处理部分去处理。
try 语句中如果发生了异常(Exception),那么程序会跳转到catch语句。
Java会将异常相关信息封装在一个异常类的实例中,ex是指向这个异常实例的引用
“处理”最简单的方法,就是调用printStackTrace将异常信息输出到控制台
catch语句执行完毕,程序会继续向下顺序执行
3.2 异常的分类
所有异常的父类:Throwable
两类异常:Error 和 Exception
checked exception:语法要求必须要用try catch 或者 throws 语句处理的异常
unchecked exception:语法不要求一定要用 try catch 或者 throws 语句处理的异常
Error 和 RuntimeException 是 unchecked exception 的父类。我们一般使用 RuntimeException
不处理无法编译通过,ClassNotFoundException异常
修改catch后如下:
1 2 3 4 5 6 7 8 9 10 11 12 package com.geekbang.exception;public class MustHandel { public static void main (String[] args) { try { Class clazz = Class.forName("com.geekbang.exception.MustHandle" ); } catch (ClassNotFoundException e) { e.printStackTrace(); } } }
执行后抛出异常如下:
1 2 3 4 5 6 7 8 package com.geekbang.exception;public class NotHaveToHandle { public static void main (String[] args) { String str = null ; str.toLowerCase(); } }
编译可以通过,执行报错:
3.3 抛出异常的语法
可以使用throws关键字,抛出一个异常。
抛出的异常类型,可以是实际异常的父类或者本身。
可以抛出多种类型的异常,用逗号分开就可以。
1 2 3 4 5 6 7 8 9 10 package com.geekbang.exception;public class ThrowIt { public static void main (String[] args) throws ClassNotFoundException, NoSuchFieldException { Class clazz = Class.forName("abc" ); clazz.getField("" ); } }
创建一个checked exception,然后用throw关键字扔出去,方法也要有throws语句,同样的,throws语句的类型要能覆盖实际异常的类型。(方法没有throw语句,则程序报错)
unchecked exception,然后用throw关键字扔出去,方法可以有,也可以没有throws语句
1 2 3 4 5 6 7 8 9 10 11 12 13 14 15 16 17 18 19 20 21 package com.geekbang.exception;public class NewAndThrowIt { public static void main (String[] args) throws Exception { causeException(); } public static void causeException () throws Exception { throw new Exception ("" ); } public static void causeRuntimeException () throws RuntimeException { throw new RuntimeException ("" ); } }
先定义一个接口:
1 2 3 4 5 6 7 8 9 package com.geekbang.exception;public interface IntfWithEx { void danger () throws Exception; void safe () ; }
接口中danger方法,会抛出异常
继承接口:
1 2 3 4 5 6 7 8 9 10 11 12 13 14 15 16 17 18 19 20 21 22 23 package com.geekbang.exception;public class ImplIntfWithEx implements IntfWithEx { @Override public void danger () throws Exception { throw new Exception ("" ); } @Override public void safe () { throw new RuntimeException (); } }
Java异常的归宿:要么沿着方法调用栈顺序一路抛,最终造成当前线程出错退出,要么被catch住。
3.4 自定义异常 异常最重要的信息:类型、错误信息和出错时的调用栈
catch语句是根据异常类型匹配来捕获相应类型的异常的,如果类型不匹配,catch语句是不会执行的,异常会继续抛出
如果catch一个并没有被抛出的checked exception,java程序会报错,因为Java明确的知道这个类型的异常不会发生
如果catch 一个unchecked exception,Java程序不会报错。
不要使用异常来做正常程序跳转
示例1:定义一个RuntimeException异常
1 2 3 4 5 6 7 8 9 10 11 12 13 14 15 16 17 18 19 package com.geekbang.exception.myexceptions;public class MyRuntimeException extends RuntimeException { public MyRuntimeException () { } public MyRuntimeException (String message) { super (message); } public MyRuntimeException (String message, Throwable cause) { super (message, cause); } public MyRuntimeException (Throwable cause) { super (cause); } }
示例2:定义一个Exception异常
1 2 3 4 5 6 7 8 9 10 11 12 13 14 15 16 17 18 19 20 package com.geekbang.exception.myexceptions;public class MyException extends Exception { public MyException () { } public MyException (String message) { super (message); } public MyException (String message, Throwable cause) { super (message, cause); } public MyException (Throwable cause) { super (cause); } }
示例3:使用自定义的RuntimeException异常
1 2 3 4 5 6 7 8 9 10 11 public void callThrowRTException () { System.out.println("Caller3.callThrowRTException开始" ); try { Object n = null ; n.toString(); } catch (Exception ex) { throw new MyRuntimeException ("执行callThrowRTException出错" , ex); } System.out.println("Caller3.callThrowRTException结束" ); }
示例4:使用自定义的Exception异常
1 2 3 4 5 6 7 8 9 10 11 public void callThrowException () throws MyException { System.out.println("Caller3.callThrowException开始" ); try { Class.forName("com.neverland.Rabbit" ); } catch (ClassNotFoundException ex) { throw new MyException ("" , ex); } System.out.println("Caller3.callThrowException结束" ); }
3.5 try catch finally语句 3.5.1 finally使用
finally里最好不要有return语句,会打乱exception的传递
finally语句会在方法返回后,后面的方法开始前,会在try块中的return语句后
finally里给return用的变量值赋值没用
1 2 3 4 5 6 7 8 9 10 11 12 13 14 15 16 17 18 19 20 21 22 23 24 25 26 27 28 29 30 31 32 33 34 package com.geekbang.exception;public class TryFinallyAppMain { private static int VAL = 0 ; public static void main (String[] args) { System.out.println(withFinally()); System.out.println(VAL); } private static int withFinally () { int len = 0 ; try { String s = "abc" ; len = s.length(); return len; } finally { System.out.println("执行finally语句" ); len = -2 ; VAL = 999 ; } } }
输出:
3.5.2 catch 多种异常
如果一个方法抛出多种异常,可以针对多个类型有多种catch语语句
catch的类型不能有多种匹配可能,否则会出错
1 2 3 4 5 6 7 8 9 10 11 12 13 14 15 16 17 18 19 20 21 22 23 24 25 26 27 28 29 30 31 32 33 34 35 36 37 38 39 40 41 42 43 44 45 46 47 48 49 50 51 52 53 54 55 56 57 58 59 60 61 62 63 package com.geekbang.exception;import java.io.IOException;public class CatchMultiException { public static void main (String[] args) { catchMultiNew(); catchMultiOld(); } private static void catchMultiOld () { try { throwMultiException(0 ); } catch (ClassNotFoundException e) { e.printStackTrace(); } catch (IOException e) { e.printStackTrace(); } } private static void catchMultiTypeMultiMatch () { try { throwMultiException(0 ); } catch (ClassNotFoundException e) { e.printStackTrace(); } catch (IOException e) { e.printStackTrace(); }finally { } } private static void catchMultiNew () { try { throwMultiException(0 ); } catch (ClassNotFoundException | IOException e) { e.printStackTrace(); } } private static void throwMultiException (int i) throws ClassNotFoundException, IOException { switch (i) { case 1 : throw new NullPointerException ("demo" ); case 2 : throw new ClassNotFoundException ("demo" ); case 3 : throw new IOException ("demo" ); } } }
3.5.3 try catch finally语句 1 2 3 4 5 6 7 8 9 10 11 12 13 14 15 16 17 18 19 20 21 22 23 24 25 26 27 28 29 30 31 32 33 34 35 36 37 package com.geekbang.exception;public class TryCatchFinallyAppMain { private static int VAL = 0 ; public static void main (String[] args) { System.out.println(withFinally()); System.out.println(VAL); } private static int withFinally () { int len = 0 ; try { String s = null ; return s.length(); } catch (Exception ex) { len = -1 ; System.out.println("执行catch里的return语句" ); return len; } finally { System.out.println("执行finally语句" ); len = -2 ; VAL = 999 ; System.out.println("finally语句执行完毕" ); } } }
3.6 使用try语句自动回收资源 继承AutoCloseable类,并且实现close方法,在抛出异常后,会自动调用close释放资源。
1 2 3 4 5 6 7 8 9 10 11 12 13 14 15 16 17 18 19 20 21 22 23 24 25 26 27 28 package com.geekbang.exception;import java.io.IOException;public class MyAutoClosableResource implements AutoCloseable { private String resName; private int counter; public MyAutoClosableResource (String resName) { this .resName = resName; } public String read () throws IOException { counter++; if (Math.random() > 0.1 ) { return "You got lucky to read from " + resName + " for " + counter + " times..." ; } else { throw new IOException ("resource不存在哦" ); } } @Override public void close () throws Exception { System.out.println("资源释放了:" + resName); } }
示例:
1 2 3 4 5 6 7 8 9 10 11 12 13 14 15 16 17 package com.geekbang.exception;public class TryWithResource { public static void main (String[] args) { try ( MyAutoClosableResource res1 = new MyAutoClosableResource ("res1" ); MyAutoClosableResource res2 = new MyAutoClosableResource ("res2" ) ) { while (true ) { System.out.println(res1.read()); System.out.println(res2.read()); } } catch (Exception e) { e.printStackTrace(); } } }
输出:
3.7 Java中的常见异常
NullPointerException
IndexOutOfBoundsException
ClassCastException
ClassNotFoundException
IOException
4 Java中常用工具类和新语法 4.1 Collection类 Collection是一个接口,被很多类继承,如下:
4.1.1 Collection中的List List常分为两个,一个ArrayList,一个LinkedList,顾名思义,一个是用数组实现,一个使用链表实现。优先使用ArrayList。在数组达到创建时的大小时,会自动扩容。
1 2 3 4 5 6 7 8 9 10 11 12 13 14 15 16 17 18 19 20 21 22 23 24 25 26 27 28 29 30 31 32 33 34 35 36 37 38 39 40 41 42 43 44 45 46 47 48 49 50 51 52 53 package com.geekbang.learncollection;import com.geekbang.learncollection.mylist.MyArrayList;import com.geekbang.learncollection.mylist.MyLinkedList;import java.util.ArrayList;import java.util.Collection;import java.util.LinkedList;import java.util.List;public class UseListAppMain { public static void main (String[] args) { printCollection(addElementsToCollection(new ArrayList ())); printCollection(addElementsToCollection(new LinkedList ())); printList((List) addElementsToCollection(new ArrayList ())); printList((List) addElementsToCollection(new MyArrayList ())); printList((List) addElementsToCollection(new MyLinkedList ())); } public static Collection addElementsToCollection (Collection collection) { for (int i = 0 ; i < 10 ; i++) { collection.add("str" + (i % 5 )); } return collection; } public static void printCollection (Collection collection) { System.out.println(); System.out.println("输出" + collection.getClass() + "中的元素,共" + collection.size() + "个" ); try { for (Object element : collection) { System.out.println(element); } } catch (Exception ex) { ex.printStackTrace(); } } public static void printList (List list) { System.out.println(); System.out.println("输出" + list.getClass() + "中的元素,共" + list.size() + "个" ); for (int i = 0 ; i < list.size(); i++) { System.out.println(list.get(i)); } } }
输出:输出了链表中的字符串。
4.1.2 Collection中的Set Set代表一个元素不重复的集合。
示例:HashSet的使用
1 2 3 4 5 6 7 8 9 10 11 12 13 14 15 16 17 18 19 20 21 22 23 24 25 26 27 28 29 30 31 32 package com.geekbang.learncollection;import java.util.ArrayList;import java.util.Collection;import java.util.HashSet;public class UseSetAppMain { public static void main (String[] args) { printCollection(addElementsToCollection(new HashSet ())); printCollection(addElementsToCollection(new ArrayList ())); } public static Collection addElementsToCollection (Collection collection) { for (int i = 0 ; i < 10 ; i++) { collection.add("str" + (i % 5 )); } return collection; } public static void printCollection (Collection collection) { System.out.println(); System.out.println("输出" + collection.getClass() + "中的元素,共" + collection.size() + "个" ); try { for (Object element : collection) { System.out.println(element); } } catch (Exception ex) { ex.printStackTrace(); } } }
输出:
1 2 3 4 5 6 7 8 9 10 11 12 13 14 15 16 17 18 输出class java.util.HashSet中的元素,共5个 str3 str4 str1 str2 str0 输出class java.util.ArrayList中的元素,共10个 str0 str1 str2 str3 str4 str0 str1 str2 str3 str4
HashSet中的数据不会出现重复。
4.2 泛型 4.2.1 泛型示例 使用List里存储String类型的示例,如果不使用泛型,则每次读出数据就需要把结果强制类型转换为String,很是麻烦,可以直接定义一个存储String的List,格式如:List<String>
1 2 3 4 5 6 7 8 9 10 11 12 13 14 15 16 17 18 19 20 21 22 23 24 25 26 27 28 29 30 31 32 33 34 35 36 37 38 39 40 41 42 43 44 45 46 47 48 49 50 51 52 53 54 55 56 57 package com.geekbang.learngenerics;import java.util.ArrayList;import java.util.List;public class UseGenericClassAppMain { public static void main (String[] args) { useStringListGenerics(); } private static List createStringList () { List ret = new ArrayList (); for (int i = 0 ; i < 10 ; i++) { ret.add("str" + (i % 5 )); } return ret; } private static void useStringList () { List strList = createStringList(); for (int i = 0 ; i < strList.size(); i++) { String str = (String) strList.get(i); str = str.toUpperCase(); System.out.println(str); } } private static List<String> createStringListGenerics () { List<String> ret = new ArrayList <>(); for (int i = 0 ; i < 10 ; i++) { ret.add("str" + (i % 5 )); } return ret; } private static void useStringListGenerics () { List<String> strList = createStringListGenerics(); for (int i = 0 ; i < strList.size(); i++) { String str = strList.get(i).toUpperCase(); System.out.println(str); } } }
4.2.2 泛型的作用
告诉编译器帮我们检查类型是否匹配,定义时泛型指定了类型。
在使用的地方,自动执行了类型强制转换。
示例:定义一个泛型类
1 2 3 4 5 6 7 8 9 10 11 12 13 14 15 16 17 18 19 20 21 22 23 24 25 26 27 28 29 30 31 32 33 34 35 36 37 38 package com.geekbang.learngenerics.define;public class MyGenericClass <First, Second> { private First first; private Second second; public MyGenericClass (First first, Second second) { this .first = first; this .second = second; } public First getFirst () { return first; } public void setFirst (First first) { this .first = first; } public Second getSecond () { return second; } public void setSecond (Second second) { this .second = second; } public <Another> Another getAnother (Object val) { return (Another) val; } }
使用以上泛型的类:
1
2
3 4 5 6 7 8 9 10 11 12 13 14 15 16 17 18 19 20 21 22 23 24 25 26 27 28 29 30 31 32 33 34 35 36 37 38 39 package com.geekbang.learngenerics;import com.geekbang.learngenerics.define.MyGenericClass;import com.geekbang.learngenerics.ext.GrandParent;import com.geekbang.learngenerics.ext.Parent;import java.lang.reflect.Field;public class DefineGenericTypesAppMain { public static void main (String[] args) throws NoSuchFieldException { Field field2 = MyGenericClass.class.getDeclaredField("first" ); System.out.println("first的类型是" + field2.getType()); MyGenericClass<String, Object> test = new MyGenericClass <>("inst1" , new Object ()); MyGenericClass<String, Object> test2 = new MyGenericClass <>("inst2" , "aaabbb" ); String first = test.getFirst(); System.out.println(first); MyGenericClass mc = new MyGenericClass ("" , "" ); MyGenericClass<GrandParent, Parent> cast = mc; cast.getFirst(); } }
定义泛型,就是把需要的类型定义在类后面的尖括号里,然后在类里面就可以把定义好的泛型像符号一样使用,也可以继承其他类。
1 2 3 4 5 6 7 8 9 10 11 12 13 14 15 16 17 18 19 package com.geekbang.learngenerics.define;import com.geekbang.learngenerics.ext.GrandParent;public class MyGenericClassBounded <MyType extends GrandParent > { private MyType myType; public MyGenericClassBounded (MyType myType) { myType.getNum(); this .myType = myType; } public void setMyType (MyType myType) { this .myType = myType; } }
使用:
1 2 3 4 5 6 7 8 9 10 11 12 13 14 15 package com.geekbang.learngenerics;import com.geekbang.learngenerics.define.MyGenericClassBounded;import java.lang.reflect.Field;public class DefineBoundedGenericTypesAppMain { public static void main (String[] args) throws NoSuchFieldException { Field field = MyGenericClassBounded.class.getDeclaredField("myType" ); System.out.println(field.getType()); } }
输出:
1 class com.geekbang.learngenerics.ext.GrandParent
4.2.3 协变和逆变 泛型定义的类型,不适用于继承关系,做为参数传递时,需要严格匹配。
1 2 3 4 5 6 7 8 9 10 11 12 List<Children> g3List = new ArrayList <>(); extMethod(g3List); public static void justG2Method (List<Parent> extParam) {} public static void extMethod (List<? extends Parent> extParam) {}
创建协变的引用:
1 2 3 4 5 6 7 8 9 10 11 12 13 14 15 16 17 18 19 20 List<? extends Parent > g2ListExt = null ; g2ListExt = new ArrayList <Children>(); g2ListExt = new ArrayList <Parent>(); List<Children> g3OnlyList = new ArrayList <>(); g2ListExt = g3OnlyList;
逆变: 与协变正好相反
1 2 3 4 5 6 7 8 9 10 11 12 13 14 15 16 List<? super Parent> g2ListSup = null ; g2ListSup = new ArrayList <Parent>(); g2ListSup = new ArrayList <GrandParent>();
4.2.4 泛型方法 泛型方法的格式:
1 [访问权限] <泛型> 返回类型 ⽅法名([泛型标识参数名称]) 抛出的异常
例如:
1 2 3 public <E> List<E> ⽅法名(E[] arr) throws Exception{}
示例:
1 2 3 4 5 6 7 8 9 10 11 12 class ArrayAlg { public static <T extends Comparable > Pair<T> minmax (T[] a) { if (a == null || a.length == 0 ) return null ; T min = a[0 ]; T max = a[0 ]; for (int i = 1 ; i < a.length; i++) { if (min.compareTo(a[i]) > 0 ) min = a[i]; if (max.compareTo(a[i]) < 0 ) max = a[i]; } return new Pair <>(min, max); } }
类型变量的限定,泛型方法minmax只能在实现了Comparable接口的类(如String,LocalDate等)的数组上调用。
静态方法也可以是泛型方法,因为泛型参数是在调⽤⽅法时确定的,并⾮在实例化类时确定。
1 2 3 public static <E> List<E> copyFromArrayToList (E[] arr) { }
4.3 Iterator 接口 实现Iterable接口,就可以支持 forEach 循环。
1 2 3 4 5 6 7 8 9 10 11 12 13 14 15 16 17 18 19 @Override public Iterator<T> iterator () { return new Iterator <T>() { int pointer = 0 ; @Override public boolean hasNext () { return pointer < size(); } @SuppressWarnings("unchecked") @Override public T next () { return (T) elements[pointer++]; } }; }
5 工具使用 5.1 Maven 5.1.1 Maven 介绍 Maven有两部分,首先是服务器端,加 maven repo,它将所有的jar包放在一个仓库里。
推荐的 maven repo 镜像:https://developer.aliyun.com/article/78124
1 2 3 4 5 6 7 8 <mirrors > <mirror > <id > alimaven</id > <name > aliyun maven</name > <url > http://maven.aliyun.com/nexus/content/groups/public/</url > <mirrorOf > central</mirrorOf > </mirror > </mirrors >
2. IntelliJ 的 maven settings 配置 maven 路径
3. pom.xml 文件添加
1 2 3 4 5 6 7 8 9 10 11 12 13 <repositories > <repository > <id > alimaven</id > <name > aliyun maven</name > <url > http://maven.aliyun.com/nexus/content/groups/public/</url > <releases > <enabled > true</enabled > </releases > <snapshots > <enabled > false</enabled > </snapshots > </repository > </repositories >
1.5.2 构建流程 Maven的生命周期(lifecycle)由一系列阶段(phase)构成,以内置的生命周期default为例,它包含以下phase:
validate
initialize
generate-sources
process-sources
generate-resources
process-resources
compile
process-classes
generate-test-sources
process-test-sources
generate-test-resources
process-test-resources
test-compile
process-test-classes
test
prepare-package
package
pre-integration-test
integration-test
post-integration-test
verify
install
deploy
在实际开发过程中,经常使用的命令有:
mvn clean:清理所有生成的class和jar;mvn clean compile:先清理,再执行到compile;mvn clean test:先清理,再执行到test,因为执行test前必须执行compile,所以这里不必指定compile;mvn clean package:先清理,再执行到package。maven 构建中的几个主要 phase:compile、test、package、install
mvn clean install 或者 mvn clean install -U
mvn dependency:tree :查看jar包依赖
1.5.3 依赖关系 Maven定义了几种依赖关系,分别是compile、test、runtime和provided:
scope
说明
示例
compile
编译时需要用到该jar包(默认)
commons-logging
test
编译Test时需要用到该jar包
junit
runtime
编译时不需要,但运行时需要用到
mysql
provided
编译时需要用到,但运行时由JDK或某个服务器提供
servlet-api
1.5.4 插件 maven 其实是一套框架,所有的具体任务都是插件完成的。除了核心的编译打包插件,还有很多其他插件。
如打出 fatjar 的插件,插件在 build->plugin 下:
1 2 3 4 5 6 7 8 9 10 11 12 13 14 15 16 17 18 19 20 21 22 23 24 25 26 <build > <plugins > <plugin > <artifactId > maven-assembly-plugin</artifactId > <configuration > <descriptorRefs > <descriptorRef > jar-with-dependencies</descriptorRef > </descriptorRefs > <archive > <manifest > <mainClass > com.geekbang.ppttools.TOCGen</mainClass > </manifest > </archive > </configuration > <executions > <execution > <id > make-assembly</id > <phase > package</phase > <goals > <goal > single</goal > </goals > </execution > </executions > </plugin > </plugins > </build >
列举了一些常用的插件:
maven-shade-plugin:打包所有依赖包并生成可执行jar;
cobertura-maven-plugin:生成单元测试覆盖率报告;
findbugs-maven-plugin:对Java源码进行静态分析以找出潜在问题。
1.5.5 模块管理 Maven可以有效地管理多个模块,只需要把每个模块当作一个独立的Maven项目,它们有各自独立的pom.xml。
1 2 3 4 5 6 7 8 9 10 11 12 13 multiple-project ├── pom.xml ├── parent │ └── pom.xml ├── module-a │ ├── pom.xml │ └── src ├── module-b │ ├── pom.xml │ └── src └── module-c ├── pom.xml └── src
模块A和模块B,可以提取出共同部分作为parent:
1 2 3 4 5 6 7 8 9 10 11 12 13 14 15 16 17 18 19 20 21 22 23 24 25 26 27 28 29 30 31 32 33 34 35 36 37 38 39 40 <project xmlns ="http://maven.apache.org/POM/4.0.0" xmlns:xsi ="http://www.w3.org/2001/XMLSchema-instance" xsi:schemaLocation ="http://maven.apache.org/POM/4.0.0 http://maven.apache.org/xsd/maven-4.0.0.xsd" > <modelVersion > 4.0.0</modelVersion > <groupId > com.itranswarp.learnjava</groupId > <artifactId > parent</artifactId > <version > 1.0</version > <packaging > pom</packaging > <name > parent</name > <properties > <project.build.sourceEncoding > UTF-8</project.build.sourceEncoding > <project.reporting.outputEncoding > UTF-8</project.reporting.outputEncoding > <maven.compiler.source > 11</maven.compiler.source > <maven.compiler.target > 11</maven.compiler.target > <java.version > 11</java.version > </properties > <dependencies > <dependency > <groupId > org.slf4j</groupId > <artifactId > slf4j-api</artifactId > <version > 1.7.28</version > </dependency > <dependency > <groupId > ch.qos.logback</groupId > <artifactId > logback-classic</artifactId > <version > 1.2.3</version > <scope > runtime</scope > </dependency > <dependency > <groupId > org.junit.jupiter</groupId > <artifactId > junit-jupiter-engine</artifactId > <version > 5.5.2</version > <scope > test</scope > </dependency > </dependencies > </project >
parent的<packaging>是pom而不是jar,因为parent本身不含任何Java代码。编写parent的pom.xml只是为了在各个模块中减少重复的配置。
1 2 3 4 5 6 7 8 9 10 11 12 13 14 15 16 <project xmlns ="http://maven.apache.org/POM/4.0.0" xmlns:xsi ="http://www.w3.org/2001/XMLSchema-instance" xsi:schemaLocation ="http://maven.apache.org/POM/4.0.0 http://maven.apache.org/xsd/maven-4.0.0.xsd" > <modelVersion > 4.0.0</modelVersion > <parent > <groupId > com.itranswarp.learnjava</groupId > <artifactId > parent</artifactId > <version > 1.0</version > <relativePath > ../parent/pom.xml</relativePath > </parent > <artifactId > module-a</artifactId > <packaging > jar</packaging > <name > module-a</name > </project >
如果模块A依赖模块B,则模块A需要模块B的jar包才能正常编译,我们需要在模块A中引入模块B:
1 2 3 4 5 6 7 8 ... <dependencies > <dependency > <groupId > com.itranswarp.learnjava</groupId > <artifactId > module-b</artifactId > <version > 1.0</version > </dependency > </dependencies >
在根目录创建一个pom.xml统一编译:1 2 3 4 5 6 7 8 9 10 11 12 13 14 15 16 17 18 <project xmlns ="http://maven.apache.org/POM/4.0.0" xmlns:xsi ="http://www.w3.org/2001/XMLSchema-instance" xsi:schemaLocation ="http://maven.apache.org/POM/4.0.0 http://maven.apache.org/maven-v4_0_0.xsd" > <modelVersion > 4.0.0</modelVersion > <groupId > com.itranswarp.learnjava</groupId > <artifactId > build</artifactId > <version > 1.0</version > <packaging > pom</packaging > <name > build</name > <modules > <module > parent</module > <module > module-a</module > <module > module-b</module > <module > module-c</module > </modules > </project >
mvn clean package时,Maven根据根目录的pom.xml找到包括parent在内的共4个<module>,一次性全部编译。
5.2 Intellij 功能使用 常用快捷功能:
5.3 常用类库 工具类库:
测试:junit、testng
日志:slf4j + logback
序列化:avro、protobuff
JSON处理:Jackson、Gson
框架类库:
应用开发框架:Spring + Spring Boot
REST API 开发:Swagger Codegen + Swagger UI + https://editor.swagger.io
网络框架:Netty
ORM框架:Hibernate、MyBatis、iBatis