1 注解(Annotation) 1.1 注解概述 注解(Annotation)是从JDK5.0开始引入,以“@注解名”在代码中存在。例如:
1
2
3
@Override @Deprecated @SuppressWarnings(value=”unchecked”)
Annotation 可以像修饰符一样被使用,可用于修饰包、类、构造器、方法、成员变量、参数、局部变量的声明。还可以添加一些参数值,这些信息被保存在 Annotation 的 “name=value” 对中。
注解可以在类编译、运行时进行加载,体现不同的功能。
未来的开发模式都是基于注解的,JPA是基于注解的,Spring2.5以上都是基于注解的,Hibernate3.x以后也是基于注解的,Struts2有一部分也是基于注解的了。注解是一种趋势,一定程度上可以说:框架 = 注解 + 反射 + 设计模式。
1.2 常见的Annotation的作用 1.2.1 生成文档相关的注解 1 2 3 4 5 6 7 @author 标明开发该类模块的作者,多个作者之间使用,分割@version 标明该类模块的版本@see 参考转向,也就是相关主题@since 从哪个版本开始增加的@param 对方法中某参数的说明,如果没有参数就不能写@return 对方法返回值的说明,如果方法的返回值类型是void 就不能写@exception 对方法可能抛出的异常进行说明 ,如果方法没有用throws 显式抛出的异常就不能写
示例:
1 2 3 4 5 6 7 8 9 10 11 12 13 14 15 16 17 18 19 20 21 22 23 package com.annotation.javadoc;public class JavadocTest { public static void main (String[] args) { } public static double getArea (double radius) { return Math.PI * radius * radius; } }
1.2.2 在编译时进行格式检查(JDK内置的三个基本注解) @Override: 限定重写父类方法,该注解只能用于方法@Deprecated: 用于表示所修饰的元素(类,方法等)已过时。通常是因为所修饰的结构危险或存在更好的选择@SuppressWarnings: 抑制编译器警告
示例:
1 2 3 4 5 6 7 8 9 10 11 12 13 14 15 16 17 18 package com.annotation.javadoc; public class AnnotationTest { public static void main (String[] args) { @SuppressWarnings("unused") int a = 10 ; } @Deprecated public void print () { System.out.println("过时的方法" ); } @Override public String toString () { return "重写的toString方法()" ; } }
1.2.3 跟踪代码依赖性,实现替代配置文件功能
1 2 3 4 5 6 7 8 9 10 @Transactional(propagation=Propagation.REQUIRES_NEW,isolation=Isolation.READ_COMMITTED,readOnly=false,timeout=3) public void buyBook (String username, String isbn) { int price = bookShopDao.findBookPriceByIsbn(isbn); bookShopDao.updateBookStock(isbn); bookShopDao.updateUserAccount(username, price); }
1 2 3 4 5 6 7 8 9 <tx:advice transaction-manager ="dataSourceTransactionManager" id ="txAdvice" > <tx:attributes > <tx:method name ="buyBook" propagation ="REQUIRES_NEW" isolation ="READ_COMMITTED" read-only ="false" timeout ="3" /> </tx:attributes > </tx:advice >
1.3 三个基本注解 1.3.1 @Override
用于检测被标记的方法为有效的重写方法,如果不是,则报编译错误!
只能标记在方法上。
它会被编译器程序读取。
1.3.2 @Deprecated
用于表示被标记的数据已经过时,不推荐使用。
可以用于修饰 属性、方法、构造、类、包、局部变量、参数。
它会被编译器程序读取。
1.3.3 @SuppressWarnings
抑制编译警告。当我们不希望看到警告信息的时候,可以使用 SuppressWarnings 注解来抑制警告信息
可以用于修饰类、属性、方法、构造、局部变量、参数
它会被编译器程序读取。
可以指定的警告类型有(了解)
all,抑制所有警告
unchecked,抑制与未检查的作业相关的警告
unused,抑制与未用的程式码及停用的程式码相关的警告
deprecation,抑制与淘汰的相关警告
nls,抑制与非 nls 字串文字相关的警告
null,抑制与空值分析相关的警告
rawtypes,抑制与使用 raw 类型相关的警告
static-access,抑制与静态存取不正确相关的警告
static-method,抑制与可能宣告为 static 的方法相关的警告
super,抑制与置换方法相关但不含 super 呼叫的警告
…
1.4 元注解 JDK1.5在java.lang.annotation包定义了4个标准的meta-annotation类型,它们被用来提供对其它 annotation类型作说明。
(1)**@Target:** 用于描述注解的使用范围
可以通过枚举类型ElementType的10个常量对象来指定
TYPE,METHOD,CONSTRUCTOR,PACKAGE…..
(2)**@Retention:** 用于描述注解的生命周期
可以通过枚举类型RetentionPolicy的3个常量对象来指定
SOURCE(源代码)、CLASS(字节码)、RUNTIME(运行时)
唯有RUNTIME阶段才能被反射读取到。
(3)**@Documented:表明这个注解应该被 javadoc工具记录。 @Inherited:** 允许子类继承父类中的注解
示例代码:
1 2 3 4 5 6 7 8 package java.lang;import java.lang.annotation.*;@Target(ElementType.METHOD) @Retention(RetentionPolicy.SOURCE) public @interface Override {}
1 2 3 4 5 6 7 8 9 10 package java.lang;import java.lang.annotation.*;import static java.lang.annotation.ElementType.*;@Target({TYPE, FIELD, METHOD, PARAMETER, CONSTRUCTOR, LOCAL_VARIABLE}) @Retention(RetentionPolicy.SOURCE) public @interface SuppressWarnings { String[] value(); }
1 2 3 4 5 6 7 8 9 10 package java.lang;import java.lang.annotation.*;import static java.lang.annotation.ElementType.*;@Documented @Retention(RetentionPolicy.RUNTIME) @Target(value={CONSTRUCTOR, FIELD, LOCAL_VARIABLE, METHOD, PACKAGE, PARAMETER, TYPE}) public @interface Deprecated {}
1.5 自定义注解的使用 1.5.1 注解的定义 一个完整的注解应该包含三个部分:
定义注解:
1 2 3 4 【元注解】 【修饰符】 @interface 注解名{ 【成员列表】 }
自定义注解可以通过四个元注解@Retention,@Target,@Inherited,@Documented,分别说明它的声明周期,使用位置,是否被继承,是否被生成到API文档中。
Annotation 的成员在 Annotation 定义中以无参数有返回值的抽象方法的形式来声明,我们又称为配置参数。返回值类型只能是八种基本数据类型、String类型、Class类型、enum类型、Annotation类型、以上所有类型的数组
可以使用 default 关键字为抽象方法指定默认返回值
如果定义的注解含有抽象方法,那么使用时必须指定返回值,除非它有默认值。格式是“方法名 = 返回值”,如果只有一个抽象方法需要赋值,且方法名为value,可以省略“value=”,所以如果注解只有一个抽象方法成员,建议使用方法名value。
1.5.2 自定义注解使用
声明自定义注解
1 2 3 4 5 6 7 8 9 10 package com.atguigu.annotation;import java.lang.annotation.*;@Inherited @Target(ElementType.TYPE) @Retention(RetentionPolicy.RUNTIME) public @interface Table { String value () ; }
1 2 3 4 5 6 7 8 9 10 11 package com.atguigu.annotation;import java.lang.annotation.*;@Inherited @Target(ElementType.FIELD) @Retention(RetentionPolicy.RUNTIME) public @interface Column { String columnName () ; String columnType () ; }
使用自定义注解
1 2 3 4 5 6 7 8 9 10 11 12 13 14 15 16 17 18 19 20 21 22 23 24 25 26 27 28 29 30 31 32 33 34 package com.atguigu.annotation;@Table("t_stu") public class Student { @Column(columnName = "sid",columnType = "int") private int id; @Column(columnName = "sname",columnType = "varchar(20)") private String name; public int getId () { return id; } public void setId (int id) { this .id = id; } public String getName () { return name; } public void setName (String name) { this .name = name; } @Override public String toString () { return "Student{" + "id=" + id + ", name='" + name + '\'' + '}' ; } }
读取和处理自定义注解
自定义注解必须配上注解的信息处理流程才有意义。
1 2 3 4 5 6 7 8 9 10 11 12 13 14 15 16 17 18 19 20 21 22 23 24 25 26 27 28 29 30 31 32 33 34 35 36 package com.atguigu.annotation;import java.lang.reflect.Field;public class TestAnnotation { public static void main (String[] args) { Class studentClass = Student.class; Table tableAnnotation = (Table) studentClass.getAnnotation(Table.class); String tableName = "" ; if (tableAnnotation != null ){ tableName = tableAnnotation.value(); } Field[] declaredFields = studentClass.getDeclaredFields(); String[] columns = new String [declaredFields.length]; int index = 0 ; for (Field declaredField : declaredFields) { Column column = declaredField.getAnnotation(Column.class); if (column!= null ) { columns[index++] = column.columnName(); } } String sql = "select " ; for (int i=0 ; i<index; i++) { sql += columns[i]; if (i<index-1 ){ sql += "," ; } } sql += " from " + tableName; System.out.println("sql = " + sql); } }
2 Lambda 表达式 2.1 Lambda 语法格式 在Java 8 语言中引入的一种新的语法元素和操作符。这个操作符为 “->” , 该操作符被称为 Lambda 操作符或箭头操作符。它将 Lambda 分为两个部分:
->左侧:指定了 Lambda 表达式需要的参数列表->右侧:指定了 Lambda 体,是抽象方法的实现逻辑,也即 Lambda 表达式要执行的功能。
Lambda 是函数式编程,格式为 (参数) -> {代码块}。
2.1 Lambda 表达式的几种写法 2.1.1 无参,无返回值 1 2 3 4 5 6 7 8 9 10 11 12 13 14 15 16 17 18 19 20 21 @Test public void test1 () { Runnable r1 = new Runnable () { @Override public void run () { System.out.println("我爱北京天安门" ); } }; r1.run(); System.out.println("***********************" ); Runnable r2 = () -> { System.out.println("我爱北京故宫" ); }; r2.run(); }
2.1.2 Lambda 需要一个参数,但是没有返回值。 1 2 3 4 5 6 7 8 9 10 11 12 13 14 15 16 17 18 19 20 @Test public void test2 () { Consumer<String> con = new Consumer <String>() { @Override public void accept (String s) { System.out.println(s); } }; con.accept("谎言和誓言的区别是什么?" ); System.out.println("*******************" ); Consumer<String> con1 = (String s) -> { System.out.println(s); }; con1.accept("一个是听得人当真了,一个是说的人当真了" ); }
2.1.3 数据类型可以省略 1 2 3 4 5 6 7 8 9 10 11 12 13 14 15 16 @Test public void test3 () { Consumer<String> con1 = (String s) -> { System.out.println(s); }; con1.accept("一个是听得人当真了,一个是说的人当真了" ); System.out.println("*******************" ); Consumer<String> con2 = (s) -> { System.out.println(s); }; con2.accept("一个是听得人当真了,一个是说的人当真了" ); }
Lambda 表达式中无需指定类型,程序依然可以编译,这是因为 javac 根据程序的上下文,在后台推断出了参数的类型。Lambda 表达式的类型依赖于上下文环境,是由编译器推断出来的。这就是所谓的“类型推断”。
2.1.4 Lambda 若只需要一个参数时,参数的小括号可以省略 1 2 3 4 5 6 7 8 9 10 11 12 13 14 15 16 17 @Test public void test4 () { Consumer<String> con1 = (s) -> { System.out.println(s); }; con1.accept("一个是听得人当真了,一个是说的人当真了" ); System.out.println("*******************" ); Consumer<String> con2 = s -> { System.out.println(s); }; con2.accept("一个是听得人当真了,一个是说的人当真了" ); }
2.1.5 Lambda 需要两个或以上的参数,多条执行语句,并且可以有返回值 1 2 3 4 5 6 7 8 9 10 11 12 13 14 15 16 17 18 19 20 21 22 23 24 25 @Test public void test5 () { Comparator<Integer> com1 = new Comparator <Integer>() { @Override public int compare (Integer o1, Integer o2) { System.out.println(o1); System.out.println(o2); return o1.compareTo(o2); } }; System.out.println(com1.compare(12 ,21 )); System.out.println("*****************************" ); Comparator<Integer> com2 = (o1,o2) -> { System.out.println(o1); System.out.println(o2); return o1.compareTo(o2); }; System.out.println(com2.compare(12 ,6 )); }
2.1.6 当 Lambda 体只有一条语句时,return 与大括号若有,都可以省略 1 2 3 4 5 6 7 8 9 10 11 12 13 14 15 16 17 18 19 20 21 22 23 24 25 26 27 28 29 30 31 @Test public void test6 () { Comparator<Integer> com1 = (o1,o2) -> { return o1.compareTo(o2); }; System.out.println(com1.compare(12 ,6 )); System.out.println("*****************************" ); Comparator<Integer> com2 = (o1,o2) -> o1.compareTo(o2); System.out.println(com2.compare(12 ,21 )); } @Test public void test7 () { Consumer<String> con1 = s -> { System.out.println(s); }; con1.accept("一个是听得人当真了,一个是说的人当真了" ); System.out.println("*****************************" ); Consumer<String> con2 = s -> System.out.println(s); con2.accept("一个是听得人当真了,一个是说的人当真了" ); }
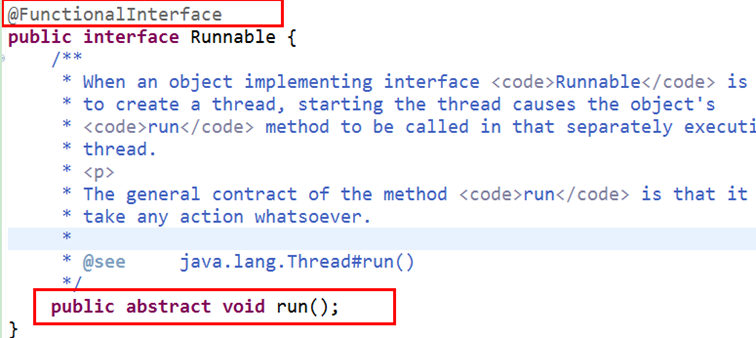
3 函数式(Functional)接口 3.1 什么是函数式接口
只包含一个抽象方法(Single Abstract Method,简称SAM)的接口,称为函数式接口。当然该接口可以包含其他非抽象方法。
你可以通过 Lambda 表达式来创建该接口的对象。(若 Lambda 表达式抛出一个受检异常(即:非运行时异常),那么该异常需要在目标接口的抽象方法上进行声明)。
我们可以在一个接口上使用 @FunctionalInterface 注解,这样做可以检查它是否是一个函数式接口。同时 javadoc 也会包含一条声明,说明这个接口是一个函数式接口。
在java.util.function包下定义了Java 8 的丰富的函数式接口
3.2 方法引用与构造器引用 Lambda表达式是可以简化函数式接口的变量或形参赋值的语法。而方法引用和构造器引用是为了简化Lambda表达式的。
3.2.1 语法格式 当要传递给Lambda体的操作,已经有实现的方法了,可以使用方法引用!
方法引用可以看做是Lambda表达式深层次的表达。换句话说,方法引用就是Lambda表达式,也就是函数式接口的一个实例,通过方法的名字来指向一个方法,可以认为是Lambda表达式的一个语法糖。
语法格式:
格式:使用方法引用操作符 “::” 将类(或对象) 与 方法名分隔开来。
如下三种主要使用情况:
情况1:对象 :: 实例方法名
情况2:类 :: 静态方法名
情况3:类 :: 实例方法名
3.2.2 方法引用使用前提 要求1: Lambda体只有一句语句,并且是通过调用一个对象的/类现有的方法来完成的
要求2:
例如:
3.2.3 使用示例 1 2 3 4 5 6 7 8 9 10 11 12 13 14 15 16 17 18 19 20 21 22 23 24 25 26 27 28 29 30 31 32 33 34 35 36 37 38 39 40 41 42 43 44 45 46 47 48 49 50 51 52 53 54 55 56 57 58 59 60 61 62 63 64 65 66 67 68 69 70 71 72 73 74 75 76 77 78 79 80 81 82 83 84 85 86 87 88 89 90 91 92 93 94 95 96 97 98 99 100 101 102 103 104 105 106 107 108 109 110 public class MethodRefTest { @Test public void test1 () { Consumer<String> con1 = str -> System.out.println(str); con1.accept("北京" ); System.out.println("*******************" ); PrintStream ps = System.out; Consumer<String> con2 = ps::println; con2.accept("beijing" ); } @Test public void test2 () { Employee emp = new Employee (1001 ,"Tom" ,23 ,5600 ); Supplier<String> sup1 = () -> emp.getName(); System.out.println(sup1.get()); System.out.println("*******************" ); Supplier<String> sup2 = emp::getName; System.out.println(sup2.get()); } @Test public void test3 () { Comparator<Integer> com1 = (t1,t2) -> Integer.compare(t1,t2); System.out.println(com1.compare(12 ,21 )); System.out.println("*******************" ); Comparator<Integer> com2 = Integer::compare; System.out.println(com2.compare(12 ,3 )); } @Test public void test4 () { Function<Double,Long> func = new Function <Double, Long>() { @Override public Long apply (Double d) { return Math.round(d); } }; System.out.println("*******************" ); Function<Double,Long> func1 = d -> Math.round(d); System.out.println(func1.apply(12.3 )); System.out.println("*******************" ); Function<Double,Long> func2 = Math::round; System.out.println(func2.apply(12.6 )); } @Test public void test5 () { Comparator<String> com1 = (s1,s2) -> s1.compareTo(s2); System.out.println(com1.compare("abc" ,"abd" )); System.out.println("*******************" ); Comparator<String> com2 = String :: compareTo; System.out.println(com2.compare("abd" ,"abm" )); } @Test public void test6 () { BiPredicate<String,String> pre1 = (s1,s2) -> s1.equals(s2); System.out.println(pre1.test("abc" ,"abc" )); System.out.println("*******************" ); BiPredicate<String,String> pre2 = String :: equals; System.out.println(pre2.test("abc" ,"abd" )); } @Test public void test7 () { Employee employee = new Employee (1001 , "Jerry" , 23 , 6000 ); Function<Employee,String> func1 = e -> e.getName(); System.out.println(func1.apply(employee)); System.out.println("*******************" ); Function<Employee,String> func2 = Employee::getName; System.out.println(func2.apply(employee)); } }
3.3 构造器引用 当Lambda表达式是创建一个对象,并且满足Lambda表达式形参,正好是给创建这个对象的构造器的实参列表,就可以使用构造器引用。
格式:类名::new
代码示例:
1 2 3 4 5 6 7 8 9 10 11 12 13 14 15 16 17 18 19 20 21 22 23 24 25 26 27 28 29 30 31 32 33 34 35 36 37 38 39 40 41 42 43 44 45 46 47 48 49 50 51 52 public class ConstructorRefTest { @Test public void test1 () { Supplier<Employee> sup = new Supplier <Employee>() { @Override public Employee get () { return new Employee (); } }; System.out.println("*******************" ); Supplier<Employee> sup1 = () -> new Employee (); System.out.println(sup1.get()); System.out.println("*******************" ); Supplier<Employee> sup2 = Employee :: new ; System.out.println(sup2.get()); } @Test public void test2 () { Function<Integer,Employee> func1 = id -> new Employee (id); Employee employee = func1.apply(1001 ); System.out.println(employee); System.out.println("*******************" ); Function<Integer,Employee> func2 = Employee :: new ; Employee employee1 = func2.apply(1002 ); System.out.println(employee1); } @Test public void test3 () { BiFunction<Integer,String,Employee> func1 = (id,name) -> new Employee (id,name); System.out.println(func1.apply(1001 ,"Tom" )); System.out.println("*******************" ); BiFunction<Integer,String,Employee> func2 = Employee :: new ; System.out.println(func2.apply(1002 ,"Tom" )); } }
3.4 数组构造引用 当Lambda表达式是创建一个数组对象,并且满足Lambda表达式形参,正好是给创建这个数组对象的长度,就可以数组构造引用。
格式:数组类型名::new
举例:
1 2 3 4 5 6 7 8 9 10 11 12 13 14 @Test public void test4 () { Function<Integer,String[]> func1 = length -> new String [length]; String[] arr1 = func1.apply(5 ); System.out.println(Arrays.toString(arr1)); System.out.println("*******************" ); Function<Integer,String[]> func2 = String[] :: new ; String[] arr2 = func2.apply(10 ); System.out.println(Arrays.toString(arr2)); }
4 Stream API 4.1 概述 Stream 是 Java8 中处理集合的关键抽象概念,它可以指定你希望对集合进行的操作,可以执行非常复杂的查找、过滤和映射数据等操作。 使用Stream API 对集合数据进行操作,就类似于使用 SQL 执行的数据库查询。也可以使用 Stream API 来并行执行操作。简言之,Stream API 提供了一种高效且易于使用的处理数据的方式。
Stream 是数据渠道,用于操作数据源(集合、数组等)所生成的元素序列。Collection 是一种静态的内存数据结构,讲的是数据,而 Stream 是有关计算的,讲的是计算。 前者是主要面向内存,存储在内存中,后者主要是面向 CPU,通过 CPU 实现计算。
注意:
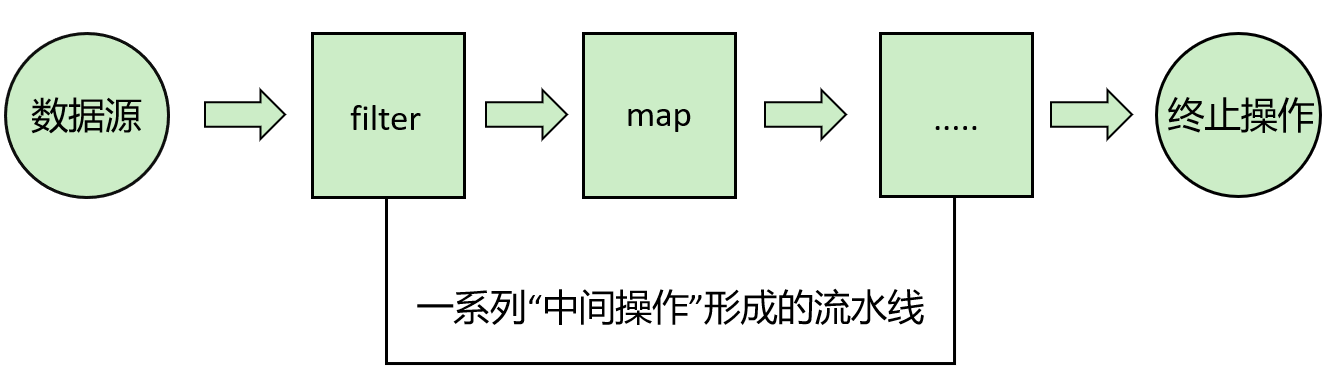
4.2 Stream的操作三个步骤 1- 创建 Stream
2- 中间操作 操作链,可对数据源的数据进行n次处理,但是在终结操作前,并不会真正执行。
3- 终止操作(终端操作)
4.2.1 创建Stream实例 方式一:通过集合
default Stream stream() : 返回一个顺序流
default Stream parallelStream() : 返回一个并行流
1 2 3 4 5 6 7 @Test public void test01 () { List<Integer> list = Arrays.asList(1 ,2 ,3 ,4 ,5 ); Stream<Integer> stream = list.stream(); }
方式二:通过数组
Java8 中的 Arrays 的静态方法 stream() 可以获取数组流:
static Stream stream(T[] array): 返回一个流
public static IntStream stream(int[] array)
public static LongStream stream(long[] array)
public static DoubleStream stream(double[] array)
1 2 3 4 5 6 7 8 9 10 11 @Test public void test02 () { String[] arr = {"hello" ,"world" }; Stream<String> stream = Arrays.stream(arr); } @Test public void test03 () { int [] arr = {1 ,2 ,3 ,4 ,5 }; IntStream stream = Arrays.stream(arr); }
方式三:通过Stream的of()
可以调用Stream类静态方法 of(), 通过显示值创建一个流。它可以接收任意数量的参数。
public static Stream of(T… values) : 返回一个流
1 2 3 4 5 @Test public void test04 () { Stream<Integer> stream = Stream.of(1 ,2 ,3 ,4 ,5 ); stream.forEach(System.out::println); }
方式四:创建无限流(了解)
迭代
生成1 2 3 4 5 6 7 8 9 10 11 12 13 14 15 @Test public void test05 () { Stream<Integer> stream = Stream.iterate(0 , x -> x + 2 ); stream.limit(10 ).forEach(System.out::println); Stream<Double> stream1 = Stream.generate(Math::random); stream1.limit(10 ).forEach(System.out::println); }
4.2.2 一系列中间操作 多个中间操作可以连接起来形成一个流水线,除非流水线上触发终止操作,否则中间操作不会执行任何的处理!而在终止操作时一次性全部处理,称为“惰性求值”。
1-筛选与切片
方 法 描 述
filter(Predicatep) 接收 Lambda , 从流中排除某些元素
distinct() 筛选,通过流所生成元素的 hashCode() 和 equals() 去除重复元素
limit(long maxSize) 截断流,使其元素不超过给定数量
skip(long n) 跳过元素,返回一个扔掉了前 n 个元素的流。
2-映 射
方法 描述
map(Function f) 接收一个函数作为参数,该函数会被应用到每个元素上,并将其映射成一个新的元素。
mapToDouble(ToDoubleFunction f) 接收一个函数作为参数,该函数会被应用到每个元素上,产生一个新的 DoubleStream。
mapToInt(ToIntFunction f) 接收一个函数作为参数,该函数会被应用到每个元素上,产生一个新的 IntStream。
mapToLong(ToLongFunction f) 接收一个函数作为参数,该函数会被应用到每个元素上,产生一个新的 LongStream。
flatMap(Function f) 接收一个函数作为参数,将流中的每个值都换成另一个流,然后把所有流连接成一个流
3-排序
方法 描述
sorted() 产生一个新流,其中按自然顺序排序
sorted(Comparator com) 产生一个新流,其中按比较器顺序排序
代码举例:
1 2 3 4 5 6 7 8 9 10 11 12 13 14 15 16 17 18 19 20 21 22 23 24 25 26 27 28 29 30 31 32 33 34 35 36 37 38 39 40 41 42 43 44 45 46 47 48 49 50 51 52 53 54 55 56 57 58 59 60 61 62 63 64 65 66 67 68 69 70 71 72 73 74 75 76 77 78 79 80 81 82 83 84 85 86 87 88 89 90 91 92 93 94 95 96 97 98 99 100 101 102 103 104 105 package com.atguigu.stream;import org.junit.Test;import java.util.Arrays;import java.util.stream.Stream;public class StreamMiddleOperate { @Test public void test01 () { Stream<Integer> stream = Stream.of(1 ,2 ,3 ,4 ,5 ,6 ); stream = stream.filter(t -> t%2 ==0 ); stream.forEach(System.out::println); } @Test public void test02 () { Stream.of(1 ,2 ,3 ,4 ,5 ,6 ) .filter(t -> t%2 ==0 ) .forEach(System.out::println); } @Test public void test03 () { Stream.of(1 ,2 ,3 ,4 ,5 ,6 ,2 ,2 ,3 ,3 ,4 ,4 ,5 ) .distinct() .forEach(System.out::println); } @Test public void test04 () { Stream.of(1 ,2 ,3 ,4 ,5 ,6 ,2 ,2 ,3 ,3 ,4 ,4 ,5 ) .limit(3 ) .forEach(System.out::println); } @Test public void test05 () { Stream.of(1 ,2 ,2 ,3 ,3 ,4 ,4 ,5 ,2 ,3 ,4 ,5 ,6 ,7 ) .distinct() .filter(t -> t%2 !=0 ) .limit(3 ) .forEach(System.out::println); } @Test public void test06 () { Stream.of(1 ,2 ,3 ,4 ,5 ,6 ,2 ,2 ,3 ,3 ,4 ,4 ,5 ) .skip(5 ) .forEach(System.out::println); } @Test public void test07 () { Stream.of(1 ,2 ,3 ,4 ,5 ,6 ,2 ,2 ,3 ,3 ,4 ,4 ,5 ) .skip(5 ) .distinct() .filter(t -> t%3 ==0 ) .forEach(System.out::println); } @Test public void test08 () { long count = Stream.of(1 ,2 ,3 ,4 ,5 ,6 ,2 ,2 ,3 ,3 ,4 ,4 ,5 ) .distinct() .peek(System.out::println) .count(); System.out.println("count=" +count); } @Test public void test09 () { Stream.of(11 ,2 ,39 ,4 ,54 ,6 ,2 ,22 ,3 ,3 ,4 ,54 ,54 ) .distinct() .sorted((t1,t2) -> -Integer.compare(t1, t2)) .limit(3 ) .forEach(System.out::println); } @Test public void test10 () { Stream.of(1 ,2 ,3 ,4 ,5 ) .map(t -> t+=1 ) .forEach(System.out::println); } @Test public void test11 () { String[] arr = {"hello" ,"world" ,"java" }; Arrays.stream(arr) .map(t->t.toUpperCase()) .forEach(System.out::println); } @Test public void test12 () { String[] arr = {"hello" ,"world" ,"java" }; Arrays.stream(arr) .flatMap(t -> Stream.of(t.split("|" ))) .forEach(System.out::println); } }
4.3.3 终止操作
终端操作会从流的流水线生成结果。其结果可以是任何不是流的值,例如:List、Integer,甚至是 void 。
流进行了终止操作后,不能再次使用。
1-匹配与查找
方法 描述
allMatch(Predicate p) 检查是否匹配所有元素
**anyMatch(Predicate p) **
检查是否至少匹配一个元素
noneMatch(Predicate p) 检查是否没有匹配所有元素
findFirst() 返回第一个元素
findAny() 返回当前流中的任意元素
count() 返回流中元素总数
max(Comparator c) 返回流中最大值
min(Comparator c) 返回流中最小值
forEach(Consumer c) 内部迭代(使用 Collection 接口需要用户去做迭代,称为外部迭代。
2-归约
方法 描述
reduce(T identity, BinaryOperator b) 可以将流中元素反复结合起来,得到一个值。返回 T
reduce(BinaryOperator b) 可以将流中元素反复结合起来,得到一个值。返回 Optional
备注:map 和 reduce 的连接通常称为 map-reduce 模式,因 Google 用它来进行网络搜索而出名。
3-收集
方 法 描 述
collect(Collector c) 将流转换为其他形式。接收一个 Collector接口的实现,
Collector 接口中方法的实现决定了如何对流执行收集的操作(如收集到 List、Set、Map)。
另外, Collectors 实用类提供了很多静态方法,可以方便地创建常见收集器实例,具体方法与实例如下表:
方法 返回类型 作用
toList Collector<T, ?, List>
把流中元素收集到List
1 List<Employee> emps= list.stream().collect(Collectors.toList());
方法 返回类型 作用
toSet Collector<T, ?, Set>
把流中元素收集到Set
1 Set<Employee> emps= list.stream().collect(Collectors.toSet());
方法 返回类型 作用
toCollection Collector<T, ?, C>
把流中元素收集到创建的集合
1 Collection<Employee> emps =list.stream().collect(Collectors.toCollection(ArrayList::new ));
方法 返回类型 作用
counting Collector<T, ?, Long>
计算流中元素的个数
1 long count = list.stream().collect(Collectors.counting());
方法 返回类型 作用
summingInt Collector<T, ?, Integer>
对流中元素的整数属性求和
1 int total=list.stream().collect(Collectors.summingInt(Employee::getSalary));
方法 返回类型 作用
averagingInt Collector<T, ?, Double>
计算流中元素Integer属性的平均值
1 double avg = list.stream().collect(Collectors.averagingInt(Employee::getSalary));
方法 返回类型 作用
summarizingInt Collector<T, ?, IntSummaryStatistics>
收集流中Integer属性的统计值。如:平均值
1 int SummaryStatisticsiss= list.stream().collect(Collectors.summarizingInt(Employee::getSalary));
方法 返回类型 作用
joining Collector<CharSequence, ?, String>
连接流中每个字符串
1 String str= list.stream().map(Employee::getName).collect(Collectors.joining());
方法 返回类型 作用
maxBy Collector<T, ?, Optional>
根据比较器选择最大值
1 Optional<Emp>max= list.stream().collect(Collectors.maxBy(comparingInt(Employee::getSalary)));
方法 返回类型 作用
minBy Collector<T, ?, Optional>
根据比较器选择最小值
1 Optional<Emp> min = list.stream().collect(Collectors.minBy(comparingInt(Employee::getSalary)));
方法 返回类型 作用
reducing Collector<T, ?, Optional>
从一个作为累加器的初始值开始,利用BinaryOperator与流中元素逐个结合,从而归约成单个值
1 int total=list.stream().collect(Collectors.reducing(0 , Employee::getSalar, Integer::sum));
方法 返回类型 作用
collectingAndThen Collector<T,A,RR>
包裹另一个收集器,对其结果转换函数
1 int how= list.stream().collect(Collectors.collectingAndThen(Collectors.toList(), List::size));
方法 返回类型 作用
groupingBy Collector<T, ?, Map<K, List>>
根据某属性值对流分组,属性为K,结果为V
1 Map<Emp.Status, List<Emp>> map= list.stream().collect(Collectors.groupingBy(Employee::getStatus));
方法 返回类型 作用
partitioningBy Collector<T, ?, Map<Boolean, List>>
根据true或false进行分区
1 Map<Boolean,List<Emp>> vd = list.stream().collect(Collectors.partitioningBy(Employee::getManage));
举例:
1 2 3 4 5 6 7 8 9 10 11 12 13 14 15 16 17 18 19 20 21 22 23 24 25 26 27 28 29 30 31 32 33 34 35 36 37 38 39 40 41 42 43 44 45 46 47 48 49 50 51 52 53 54 55 56 57 58 59 60 61 62 63 64 65 66 67 68 69 70 71 72 73 74 75 76 77 78 79 package com.atguigu.stream;import java.util.List;import java.util.Optional;import java.util.stream.Collectors;import java.util.stream.Stream;import org.junit.Test;public class StreamEndding { @Test public void test01 () { Stream.of(1 ,2 ,3 ,4 ,5 ) .forEach(System.out::println); } @Test public void test02 () { long count = Stream.of(1 ,2 ,3 ,4 ,5 ) .count(); System.out.println("count = " + count); } @Test public void test03 () { boolean result = Stream.of(1 ,3 ,5 ,7 ,9 ) .allMatch(t -> t%2 !=0 ); System.out.println(result); } @Test public void test04 () { boolean result = Stream.of(1 ,3 ,5 ,7 ,9 ) .anyMatch(t -> t%2 ==0 ); System.out.println(result); } @Test public void test05 () { Optional<Integer> opt = Stream.of(1 ,3 ,5 ,7 ,9 ).findFirst(); System.out.println(opt); } @Test public void test06 () { Optional<Integer> opt = Stream.of(1 ,2 ,3 ,4 ,5 ,7 ,9 ) .filter(t -> t%3 ==0 ) .findFirst(); System.out.println(opt); } @Test public void test07 () { Optional<Integer> opt = Stream.of(1 ,2 ,4 ,5 ,7 ,8 ) .filter(t -> t%3 ==0 ) .findFirst(); System.out.println(opt); } @Test public void test08 () { Optional<Integer> max = Stream.of(1 ,2 ,4 ,5 ,7 ,8 ) .max((t1,t2) -> Integer.compare(t1, t2)); System.out.println(max); } @Test public void test09 () { Integer reduce = Stream.of(1 ,2 ,4 ,5 ,7 ,8 ) .reduce(0 , (t1,t2) -> t1+t2); System.out.println(reduce); } @Test public void test10 () { Optional<Integer> max = Stream.of(1 ,2 ,4 ,5 ,7 ,8 ) .reduce((t1,t2) -> t1>t2?t1:t2); System.out.println(max); } @Test public void test11 () { List<Integer> list = Stream.of(1 ,2 ,4 ,5 ,7 ,8 ) .filter(t -> t%2 ==0 ) .collect(Collectors.toList()); System.out.println(list); } }
4.3 Java9新增API 新增1:Stream实例化方法
ofNullable()的使用:
Java 8 中 Stream 不能完全为null,否则会报空指针异常。而 Java 9 中的 ofNullable 方法允许我们创建一个单元素 Stream,可以包含一个非空元素,也可以创建一个空 Stream。
1 2 3 4 5 6 7 8 9 10 11 12 13 14 15 16 17 18 19 20 Stream<String> stringStream = Stream.of("AA" , "BB" , null ); System.out.println(stringStream.count()); List<String> list = new ArrayList <>(); list.add("AA" ); list.add(null ); System.out.println(list.stream().count()); Stream<Object> stream1 = Stream.ofNullable(null ); System.out.println(stream1.count()); Stream<String> stream = Stream.ofNullable("hello world" ); System.out.println(stream.count());
iterator()重载的使用:
1 2 3 4 5 6 Stream.iterate(1 ,i -> i + 1 ).limit(10 ).forEach(System.out::println); Stream.iterate(1 ,i -> i < 100 ,i -> i + 1 ).forEach(System.out::println);
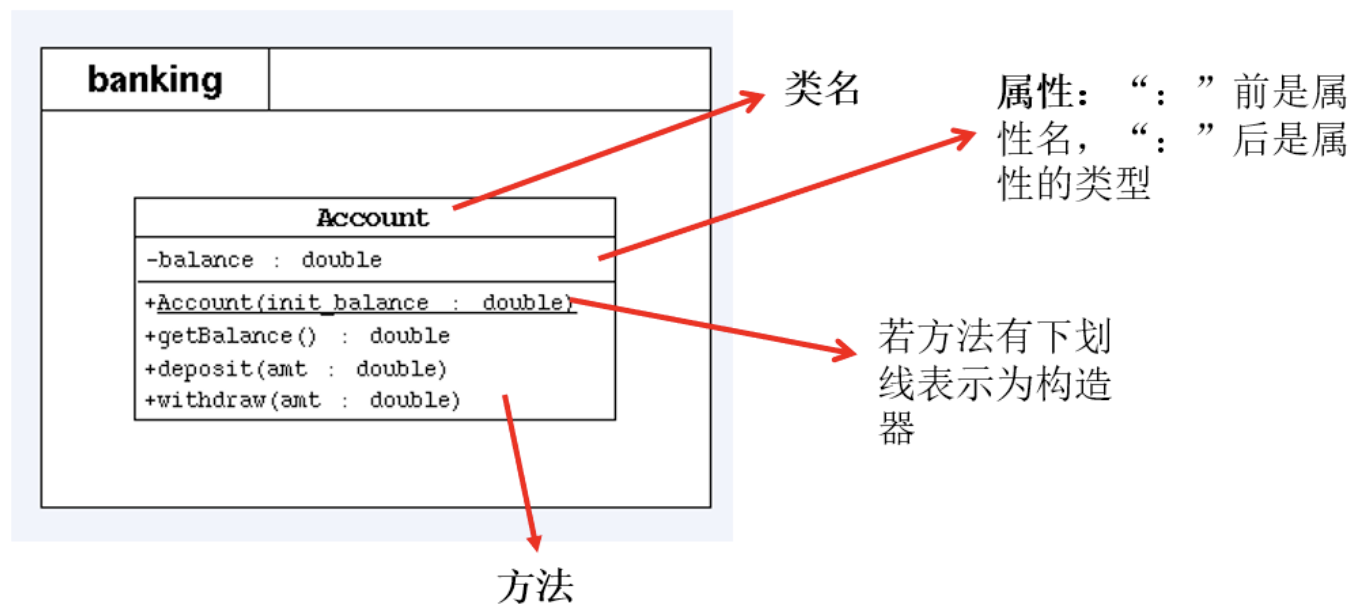
5 UML类图
UML(Unified Modeling Language,统一建模语言),用来描述 软件模型 和 架构 的图形化语言。
常用的UML工具软件有 PowerDesinger、Rose和 Enterprise Architect。
UML工具软件不仅可以绘制软件开发中所需的各种图表,还可以生成对应的源代码
+表示 public 类型, - 表示 private 类型,#表示protected类型
方法的写法: 方法的类型(+、-) 方法名(参数名: 参数类型):返回值类型
斜体表示抽象方法或类。
6 native关键字的理解 使用native关键字说明这个方法是原生函数,也就是这个方法是用C/C++等非Java语言实现的,并且被编译成了DLL,由Java去调用。
本地方法是有方法体的,用c语言编写。由于本地方法的方法体源码没有对我们开源,所以我们看不到方法体
在Java中定义一个native方法时,并不提供实现体。
1. 为什么要用native方法
2. native声明的方法,对于调用者,可以当做和其他Java方法一样使用
7 JDK8以后的新语法 7.1 异常处理之try-catch资源关闭 在JDK7 之前,我们这样处理资源的关闭:
1 2 3 4 5 6 7 8 9 10 11 12 13 14 15 16 17 18 19 20 21 22 23 24 25 26 27 28 29 @Test public void test01 () { FileWriter fw = null ; BufferedWriter bw = null ; try { fw = new FileWriter ("d:/1.txt" ); bw = new BufferedWriter (fw); bw.write("hello" ); } catch (IOException e) { e.printStackTrace(); } finally { try { if (bw != null ) { bw.close(); } } catch (IOException e) { e.printStackTrace(); } try { if (fw != null ) { fw.close(); } } catch (IOException e) { e.printStackTrace(); } } }
JDK7的新特性
在try的后面可以增加一个(),在括号中可以声明流对象并初始化。try中的代码执行完毕,会自动把流对象释放,就不用写finally了。
格式:
1 2 3 4 5 6 7 try (资源对象的声明和初始化){ 业务逻辑代码,可能会产生异常 }catch (异常类型1 e){ 处理异常代码 }catch (异常类型2 e){ 处理异常代码 }
说明:
1、在try()中声明的资源,无论是否发生异常,无论是否处理异常,都会自动关闭资源对象,不用手动关闭了。
举例:
1 2 3 4 5 6 7 8 9 10 11 12 13 14 15 16 17 18 19 20 21 22 23 24 25 26 27 28 29 30 31 32 33 34 35 36 37 @Test public void test02 () { try ( FileWriter fw = new FileWriter ("d:/1.txt" ); BufferedWriter bw = new BufferedWriter (fw); ) { bw.write("hello" ); } catch (IOException e) { e.printStackTrace(); } } @Test public void test03 () { try ( FileInputStream fis = new FileInputStream ("d:/1.txt" ); InputStreamReader isr = new InputStreamReader (fis, "utf-8" ); BufferedReader br = new BufferedReader (isr); FileOutputStream fos = new FileOutputStream ("1.txt" ); OutputStreamWriter osw = new OutputStreamWriter (fos, "gbk" ); BufferedWriter bw = new BufferedWriter (osw); ) { String str; while ((str = br.readLine()) != null ) { bw.write(str); bw.newLine(); } } catch (FileNotFoundException e) { e.printStackTrace(); } catch (IOException e) { e.printStackTrace(); } }
JDK9的新特性
try的前面可以定义流对象,try后面的()中可以直接引用流对象的名称。在try代码执行完毕后,流对象也可以释放掉,也不用写finally了。
1 2 3 4 5 6 7 A a = new A ();B b = new B ();try (a;b){ 可能产生的异常代码 }catch (异常类名 变量名){ 异常处理的逻辑 }
举例:
1 2 3 4 5 6 7 8 9 10 11 12 @Test public void test04 () { InputStreamReader reader = new InputStreamReader (System.in); OutputStreamWriter writer = new OutputStreamWriter (System.out); try (reader; writer) { } catch (IOException e) { e.printStackTrace(); } }
7.2 局部变量类型推断 JDK 10的新特性
使用举例
1 2 3 4 5 6 7 8 9 10 11 12 13 14 15 16 17 18 19 var list = new ArrayList <String>();var set = new LinkedHashSet <Integer>();for (var v : list) { System.out.println(v); } for (var i = 0 ; i < 100 ; i++) { System.out.println(i); } var iterator = set.iterator();
不适用场景
声明一个成员变量
声明一个数组变量,并为数组静态初始化(省略new的情况下)
方法的返回值类型
方法的参数类型
没有初始化的方法内的局部变量声明
作为catch块中异常类型
Lambda表达式中函数式接口的类型
方法引用中函数式接口的类型
注意:
var不是一个关键字,而是一个类型名,将它作为变量的类型。不能使用var作为类名。
这不是JavaScript。var并不会改变 Java是一门静态类型语言的事实。编译器负责推断出类型,并把结果写入字节码文件,就好像是开发人员自己敲入类型一样。
7.4 instanceof的模式匹配 JDK14中预览特性:
Java 14之前旧写法:
1 2 3 4 5 6 if (obj instanceof String){ String str = (String)obj; .. str.contains(..).. }else { ... }
Java 14新特性写法:
1 2 3 4 5 if (obj instanceof String str){ .. str.contains(..).. }else { ... }
举例:
1 2 3 4 5 6 7 8 9 10 11 12 13 14 15 16 17 18 19 20 21 22 23 24 25 26 27 28 29 30 31 32 33 34 35 36 37 38 39 40 41 42 43 44 45 46 47 48 49 50 51 52 53 54 55 56 57 58 59 60 61 62 63 64 65 public class Feature01 { @Test public void test1 () { Object obj = new String ("hello,Java14" ); obj = null ; if (obj instanceof String){ String str = (String) obj; System.out.println(str.contains("Java" )); }else { System.out.println("非String类型" ); } if (obj instanceof String str){ System.out.println(str.contains("Java" )); }else { System.out.println("非String类型" ); } } } class InstanceOf { String str = "abc" ; public void test (Object obj) { if (obj instanceof String str){ System.out.println(str.toUpperCase()); }else { System.out.println(str.toLowerCase()); } } } class Monitor { private String model; private double price; public boolean equals (Object o) { return o instanceof Monitor other && model.equals(other.model) && price == other.price; } }
7.5 switch表达式 传统switch声明语句的弊端:
匹配是自上而下的,如果忘记写break,后面的case语句不论匹配与否都会执行; —>case穿透
所有的case语句共用一个块范围,在不同的case语句定义的变量名不能重复;
不能在一个case里写多个执行结果一致的条件;
整个switch不能作为表达式返回值;
1 2 3 4 5 6 7 8 9 10 11 12 13 14 15 16 17 switch (month){ case 3 |4 |5 : System.out.println("春季" ); break ; case 6 |7 |8 : System.out.println("夏季" ); break ; case 9 |10 |11 : System.out.println("秋季" ); break ; case 12 |1 |2 : System.out.println("冬季" ); break ; default : System.out.println("输入有误" ); }
JDK12中预览特性:
Java 12将会对switch声明语句进行扩展,使用case L ->来替代以前的break;,省去了 break 语句,避免了因少写 break 而出错。
同时将多个 case 合并到一行,显得简洁、清晰,也更加优雅的表达逻辑分支。
为了保持兼容性,case 条件语句中依然可以使用字符 : ,但是同一个 switch 结构里不能混用 -> 和 : ,否则编译错误。
举例:
1 2 3 4 5 6 7 8 9 10 11 12 13 14 15 16 17 18 19 20 21 22 23 24 25 26 27 28 29 30 31 public class SwitchTest { public static void main (String[] args) { int numberOfLetters; Fruit fruit = Fruit.APPLE; switch (fruit) { case PEAR: numberOfLetters = 4 ; break ; case APPLE: case GRAPE: case MANGO: numberOfLetters = 5 ; break ; case ORANGE: case PAPAYA: numberOfLetters = 6 ; break ; default : throw new IllegalStateException ("No Such Fruit:" + fruit); } System.out.println(numberOfLetters); } } enum Fruit { PEAR, APPLE, GRAPE, MANGO, ORANGE, PAPAYA; }
switch 语句如果漏写了一个 break,那么逻辑往往就跑偏了,这种方式既繁琐,又容易出错。
Java 12中:
1 2 3 4 5 6 7 8 9 10 11 12 13 14 15 public class SwitchTest1 { public static void main (String[] args) { Fruit fruit = Fruit.GRAPE; switch (fruit){ case PEAR -> System.out.println(4 ); case APPLE,MANGO,GRAPE -> System.out.println(5 ); case ORANGE,PAPAYA -> System.out.println(6 ); default -> throw new IllegalStateException ("No Such Fruit:" + fruit); }; } }
更进一步:
1 2 3 4 5 6 7 8 9 10 11 12 13 14 15 16 public class SwitchTest2 { public static void main (String[] args) { Fruit fruit = Fruit.GRAPE; int numberOfLetters = switch (fruit){ case PEAR -> 4 ; case APPLE,MANGO,GRAPE -> 5 ; case ORANGE,PAPAYA -> 6 ; default -> throw new IllegalStateException ("No Such Fruit:" + fruit); }; System.out.println(numberOfLetters); } }
JDK13中二次预览特性:
JDK13中引入了yield语句,用于返回值。这意味着,switch表达式(返回值)应该使用yield,switch语句(不返回值)应该使用break。
yield和return的区别在于:return会直接跳出当前循环或者方法,而yield只会跳出当前switch块。
在以前:
1 2 3 4 5 6 7 8 9 10 11 12 13 14 15 16 17 @Test public void testSwitch1 () { String x = "3" ; int i; switch (x) { case "1" : i=1 ; break ; case "2" : i=2 ; break ; default : i = x.length(); break ; } System.out.println(i); }
在JDK13中:
1 2 3 4 5 6 7 8 9 10 11 12 @Test public void testSwitch2 () { String x = "3" ; int i = switch (x) { case "1" -> 1 ; case "2" -> 2 ; default -> { yield 3 ; } }; System.out.println(i); }
或者
1 2 3 4 5 6 7 8 9 10 11 12 13 @Test public void testSwitch3 () { String x = "3" ; int i = switch (x) { case "1" : yield 1 ; case "2" : yield 2 ; default : yield 3 ; }; System.out.println(i); }
JDK14中转正特性:
这是JDK 12和JDK 13中的预览特性,现在是正式特性了。
JDK17的预览特性:switch的模式匹配
旧写法:
1 2 3 4 5 6 7 8 9 10 11 12 13 static String formatter (Object o) { String formatted = "unknown" ; if (o instanceof Integer i) { formatted = String.format("int %d" , i); } else if (o instanceof Long l) { formatted = String.format("long %d" , l); } else if (o instanceof Double d) { formatted = String.format("double %f" , d); } else if (o instanceof String s) { formatted = String.format("String %s" , s); } return formatted; }
模式匹配新写法:
1 2 3 4 5 6 7 8 9 static String formatterPatternSwitch (Object o) { return switch (o) { case Integer i -> String.format("int %d" , i); case Long l -> String.format("long %d" , l); case Double d -> String.format("double %f" , d); case String s -> String.format("String %s" , s); default -> o.toString(); }; }
直接在 switch 上支持 Object 类型,这就等于同时支持多种类型,使用模式匹配得到具体类型,大大简化了语法量,这个功能很实用。
7.6 文本块 现实问题:
在Java中,通常需要使用String类型表达HTML,XML,SQL或JSON等格式的字符串,在进行字符串赋值时需要进行转义和连接操作,然后才能编译该代码,这种表达方式难以阅读并且难以维护。
JDK13的新特性
使用”””作为文本块的开始符和结束符,在其中就可以放置多行的字符串,不需要进行任何转义。因此,文本块将提高Java程序的可读性和可写性。
基本使用:
1 2 3 4 5 """ line1 line2 line3 """
相当于:
或者一个连接的字符串:
1 2 3 "line1\n" +"line2\n" +"line3\n"
如果字符串末尾不需要行终止符,则结束分隔符可以放在最后一行内容上。例如:
1 2 3 4 """ line1 line2 line3"""
相当于
文本块可以表示空字符串,但不建议这样做,因为它需要两行源代码:
举例1:普通文本
原有写法:
1 2 3 4 5 6 7 8 9 10 String text1 = "The Sound of silence\n" + "Hello darkness, my old friend\n" + "I've come to talk with you again\n" + "Because a vision softly creeping\n" + "Left its seeds while I was sleeping\n" + "And the vision that was planted in my brain\n" + "Still remains\n" + "Within the sound of silence" ; System.out.println(text1);
使用新特性:
1 2 3 4 5 6 7 8 9 10 11 String text2 = """ The Sound of silence Hello darkness, my old friend I've come to talk with you again Because a vision softly creeping Left its seeds while I was sleeping And the vision that was planted in my brain Still remains Within the sound of silence """ ;System.out.println(text2);
举例2:HTML语句
1 2 3 4 5 <html > <body > <p > Hello, 尚硅谷</p > </body > </html >
将其复制到Java的字符串中,会展示成以下内容:
1 2 3 4 5 "<html>\n" +" <body>\n" +" <p>Hello, 尚硅谷</p>\n" +" </body>\n" +"</html>\n" ;
即被自动进行了转义,这样的字符串看起来不是很直观,在JDK 13中:
1 2 3 4 5 6 7 """ <html> <body> <p>Hello, world</p> </body> </html> """ ;
7.7 Record 背景
早在2019年2月份,Java 语言架构师 Brian Goetz,曾写文抱怨“Java太啰嗦”或有太多的“繁文缛节”。他提到:开发人员想要创建纯数据载体类(plain data carriers)通常都必须编写大量低价值、重复的、容易出错的代码。如:构造函数、getter/setter、equals()、hashCode()以及toString()等。
以至于很多人选择使用IDE的功能来自动生成这些代码。还有一些开发会选择使用一些第三方类库,如Lombok等来生成这些方法。
JDK14中预览特性:神说要用record,于是就有了。 实现一个简单的数据载体类,为了避免编写:构造函数,访问器,equals(),hashCode () ,toString ()等,Java 14推出record。
record 是一种全新的类型,它本质上是一个 final 类,同时所有的属性都是 final 修饰,它会自动编译出 public get 、hashcode 、equals、toString、构造器等结构,减少了代码编写量。
具体来说:当你用record 声明一个类时,该类将自动拥有以下功能:
获取成员变量的简单方法,比如例题中的 name() 和 partner() 。注意区别于我们平常getter()的写法。
一个 equals 方法的实现,执行比较时会比较该类的所有成员属性。
重写 hashCode() 方法。
一个可以打印该类所有成员属性的 toString() 方法。
只有一个构造方法。
此外:
还可以在record声明的类中定义静态字段、静态方法、构造器或实例方法。
不能在record声明的类中定义实例字段;类不能声明为abstract;不能声明显式的父类等。
举例1(旧写法):
1 2 3 4 5 6 7 8 9 10 11 12 13 14 15 16 17 18 19 20 21 22 23 24 25 26 27 28 29 30 31 32 33 34 35 class Point { private final int x; private final int y; Point(int x, int y) { this .x = x; this .y = y; } int x () { return x; } int y () { return y; } public boolean equals (Object o) { if (!(o instanceof Point)) return false ; Point other = (Point) o; return other.x == x && other.y == y; } public int hashCode () { return Objects.hash(x, y); } @Override public String toString () { return "Point{" + "x=" + x + ", y=" + y + '}' ; } }
举例1(新写法):
1 record Point (int x, int y) { }
举例1:
1 2 public record Dog (String name, Integer age) {}
1 2 3 4 5 6 7 8 9 10 11 public class Java14Record { public static void main (String[] args) { Dog dog1 = new Dog ("牧羊犬" , 1 ); Dog dog2 = new Dog ("田园犬" , 2 ); Dog dog3 = new Dog ("哈士奇" , 3 ); System.out.println(dog1); System.out.println(dog2); System.out.println(dog3); } }
举例2:
1 2 3 4 5 6 7 8 9 10 11 12 13 14 15 16 17 18 19 20 21 22 23 24 25 26 27 28 29 30 31 32 33 34 35 36 37 38 39 40 41 42 43 public class Feature07 { @Test public void test1 () { Person p1 = new Person ("罗密欧" ,new Person ("zhuliye" ,null )); System.out.println(p1); Person p2 = new Person ("罗密欧" ,new Person ("zhuliye" ,null )); System.out.println(p1.equals(p2)); HashSet<Person> set = new HashSet <>(); set.add(p1); set.add(p2); for (Person person : set) { System.out.println(person); } System.out.println(p1.name()); System.out.println(p1.partner()); } @Test public void test2 () { Person p1 = new Person ("zhuyingtai" ); System.out.println(p1.getNameInUpperCase()); Person.nation = "CHN" ; System.out.println(Person.showNation()); } }
1 2 3 4 5 6 7 8 9 10 11 12 13 14 15 16 17 18 19 20 21 22 23 24 25 26 27 28 29 30 31 32 33 34 public record Person (String name,Person partner) { public static String nation; public static String showNation () { return nation; } public Person (String name) { this (name,null ); } public String getNameInUpperCase () { return name.toUpperCase(); } }
7.8 密封类 背景:final 关键字对类进行修饰。不过这种要么可以继承,要么不能继承的机制不够灵活,有些时候我们可能想让某个类可以被某些类型继承,但是又不能随意继承,是做不到的。Java 15 尝试解决这个问题,引入了 sealed 类,被 sealed 修饰的类可以指定子类。这样这个类就只能被指定的类继承。
JDK15的预览特性:
使用修饰符sealed,可以将一个类声明为密封类。密封的类使用保留关键字permits列出可以直接扩展(即extends)它的类。
sealed 修饰的类的机制具有传递性,它的子类必须使用指定的关键字进行修饰,且只能是 final、sealed、non-sealed 三者之一。
举例:
1 2 3 4 5 6 7 8 9 10 11 12 package com.atguigu.java;public abstract sealed class Shape permits Circle, Rectangle, Square {...}public final class Circle extends Shape {...} public sealed class Rectangle extends Shape permits TransparentRectangle, FilledRectangle {...}public final class TransparentRectangle extends Rectangle {...}public final class FilledRectangle extends Rectangle {...}public non-sealed class Square extends Shape {...}